
Products
GG网络技术分享 2025-03-18 16:08 79
部署discuz要求:实时备份,负载均衡故障转移,域名https跳转,网站伪静态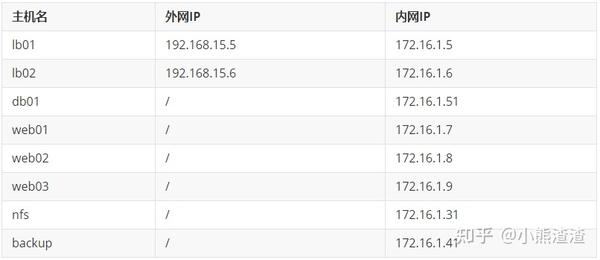
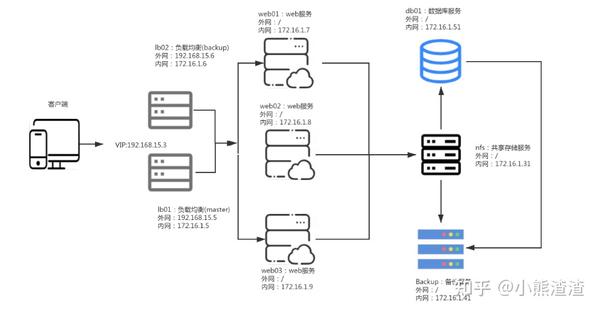

服务端
#1.关闭Firewalld防火墙[root@nfs ~]# systemctl disable firewalld[root@nfs ~]# systemctl stop firewalld#2.关闭selinux防火墙[root@nfs ~]# sed -ri "#^SELINUX=#cSELINUX=Disabled" /etc/selinux/config[root@nfs ~]# setenforce 0#3.安装服务[root@nfs ~] yum -y install nfs-utils
#4.创建用户[root@nfs ~]# groupadd -g 1000 www[root@nfs ~]# useradd -u 1000 -g 1000 -M -s /sbin/nologin www #5.编写nfs配置文件[root@nfs ~]# cat /etc/exports/nfs/conf 172.16.1.0/24(rw,sync,anonuid=1000,anongid=1000)/nfs/web 172.16.1.0/24(rw,sync,anonuid=1000,anongid=1000)#6.在NFS服务器上建立用于NFS文件共享的目录,并设置对应权限[root@nfs ~]# mkdir /nfs/{conf,web} -p[root@nfs ~]# tree /nfs/nfs
├── conf
└── web
2 directories, 0 files
[root@nfs ~]# chown -R www.www /nfs#7.启动服务[root@nfs ~]# systemctl enable rpcbind nfs-server[root@nfs ~]# systemctl restart rpcbind nfs-server[root@nfs ~]# netstat -lntup |grep 111#8.检测文件[root@nfs ~]# cat /var/lib/nfs/etab/nfs/web 172.16.1.0/24(rw,sync,wdelay,hide,nocrossmnt,secure,root_squash,no_all_squash,no_subtree_check,secure_locks,acl,no_pnfs,anonuid=1000,anongid=1000,sec=sys,rw,secure,root_squash,no_all_squash)/nfs/conf 172.16.1.0/24(rw,sync,wdelay,hide,nocrossmnt,secure,root_squash,no_all_squash,no_subtree_check,secure_locks,acl,no_pnfs,anonuid=1000,anongid=1000,sec=sys,rw,secure,root_squash,no_all_squash)客户端
# 1.配置官方源[root@web01 ~]# vim /etc/yum.repos.d/nginx.repo[nginx-stable]name=nginx stable repo
baseurl=http://nginx.org/packages/centos/$releasever/$basearch/
gpgcheck=1enabled=1gpgkey=https://nginx.org/keys/nginx_signing.key
module_hotfixes=true# 2.yum安装nginx[root@web01 ~]# yum install nginx -y# 3.创建并配置管理用户[root@web01 ~]# groupadd -g 1000 www[root@web01 ~]# useradd -u 1000 -g 1000 -M -s /sbin/nologin www# 4.修改配置文件用户[root@web01 ~]# vim /etc/nginx/nginx.confuser www;# 5.启动nginx服务[root@web01 ~]# systemctl start nginx[root@web01 ~]# ps -ef |grep [n]ginxroot 22664 1 0 20:27 ? 00:00:00 nginx: master process /usr/sbin/nginx -c /etc/nginx/nginx.conf
www 22665 22664 0 20:27 ? 00:00:00 nginx: worker process
[root@web01 ~]## 6.安装rpc[root@web01 ~]# yum -y install nfs-utils rpcbind[root@web01 ~]# systemctl restart rpcbind# 7.将web服务站点目录挂载到nfs上(这里是临时挂载,永久挂载/etc/fstab)[root@web01 ~]# showmount -e 172.16.1.31Export list for 172.16.1.31:
/nfs/web 172.16.1.0/24
/nfs/conf 172.16.1.0/24
# 8.创建存放网站代码及资料的站点目录[root@web01 ~]# mkdir /web[root@web01 ~]# chown -R www.www /web# 9.将站点目录和存放配置文件目录挂载到nfs服务器相应共享目录上[root@web01 ~]# mount -t nfs 172.16.1.31:/nfs/web /web[root@web01 ~]# mount -t nfs 172.16.1.31:/nfs/conf /etc/nginx/conf.d[root@web01 ~]# df -hFilesystem Size Used Avail Use% Mounted on
/dev/sda2 19G 1.8G 18G 9% /
devtmpfs 900M 0 900M 0% /dev
tmpfs 910M 0 910M 0% /dev/shm
tmpfs 910M 9.5M 901M 2% /run
tmpfs 910M 0 910M 0% /sys/fs/cgroup
/dev/sda1 1014M 138M 877M 14% /boot
tmpfs 182M 0 182M 0% /run/user/0
172.16.1.31:/nfs/web 19G 1.8G 18G 9% /web
172.16.1.31:/nfs/conf 19G 1.8G 18G 9% /etc/nginx/conf.d
# 8.web02,web03操作同上# 1.下载源码包至服务器[root@db01 ~]# rz -Erz waiting to receive.
[root@db01 ~]# lltotal 629764-rw-------. 1 root root 1620 Apr 14 19:41 anaconda-ks.cfg
-rw-r--r--. 1 root root 158 Apr 14 19:44 hosts.bak
-rw-r--r-- 1 root root 644869837 Nov 12 13:32 mysql-5.7.26-linux-glibc2.12-x86_64.tar.gz
# 2.解压软件[root@db01 ~]# tar xf mysql-5.7.26-linux-glibc2.12-x86_64.tar.gz[root@db01 ~]# mkdir /application[root@db01 ~]# mv mysql-5.7.26-linux-glibc2.12-x86_64 /application/mysql# 3.用户创建处理原始环境[root@db01 ~]# rpm -qa |grep mariadbmariadb-libs-5.5.60-1.el7_5.x86_64
[root@db01 ~]# yum remove mariadb-libs-5.5.60-1.el7_5.x86_64 -y[root@db01 ~]# groupadd -g 1000 www[root@db01 ~]# useradd -u 1000 -g 1000 -M -s /sbin/nologin www# 4.设置环境变量[root@db01 ~]# vim /etc/profileexport PATH=/application/mysql/bin:$PATH[root@db01 ~]# source /etc/profile[root@db01 ~]# mysql -Vmysql Ver 14.14 Distrib 5.7.26, for linux-glibc2.12 (x86_64) using EditLine wrapper
# 5.创建数据路径并授权[root@db01 ~]# mkdir /data/mysql/data -p[root@db01 ~]# chown -R www.www /data[root@db01 ~]# chown -R www.www /application/*# 6.初始化数据(创建系统数据)[root@db01 ~]# yum install -y libaio-devel[root@db01 ~]# mysqld --initialize-insecure --user=www --basedir=/application/mysql --datadir=/data/mysql/data# 7.配置文件准备cat
Demand feedback
